前言
- 本指南適用於 Ubuntu/Debian 系統
- 所有指令預設以 root 用戶執行
- 請確保伺服器可以連接外網
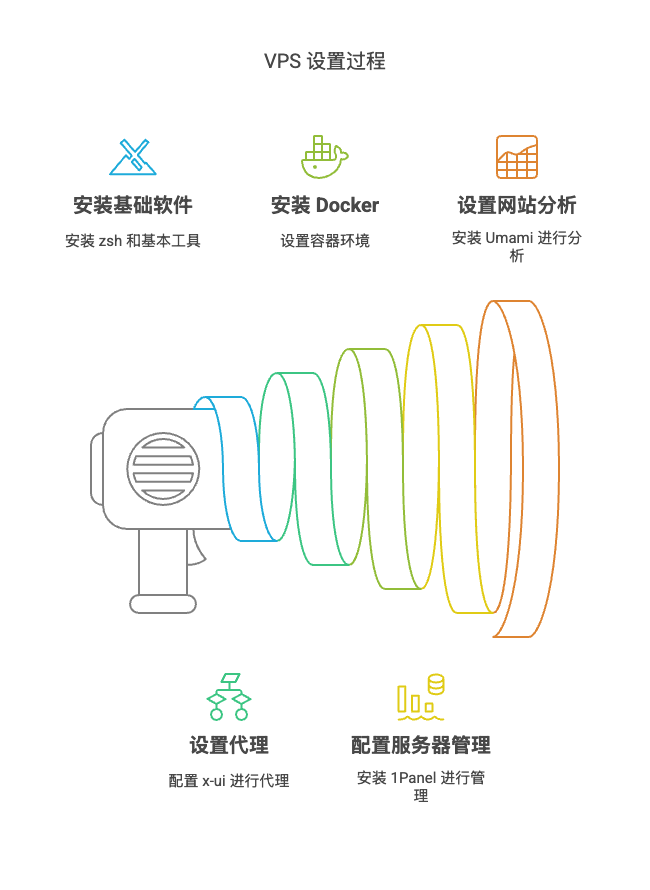
軟件安裝
1. 基礎環境配置
zsh & oh my zsh
- 安裝 zsh 並設定為預設 shell
sudo apt update
sudo apt install zsh- 安裝 curl 和 git
apt install curl -y
apt install git -y- 安裝 Oh My Zsh
sh -c "$(curl -fsSL https://raw.githubusercontent.com/ohmyzsh/ohmyzsh/master/tools/install.sh)"- 配置 ~/.zshrc 檔案
# 配置檔案位於 ~/.zshrc,可透過修改此檔案來設定主題和插件
# 常用配置:
# 設定主題
ZSH_THEME="agnoster"
# 設定插件
plugins=(git docker)
2. 伺服器代理
x-ui
- 執行一鍵安裝腳本
bash <(curl -Ls https://raw.githubusercontent.com/vaxilu/x-ui/master/install.sh)-
存取管理面板 透過瀏覽器存取:
http://伺服器IP:埠號示例:http://192.168.1.1:10000 -
更新 V2Ray 到最新版本 更新完成後系統將自動重新啟動
-
配置 vmess 節點
-
安裝 V2Ray 客戶端 推薦使用 V2rayN,支援掃描 QR Code 連接或匯入配置檔案
3. 容器環境
docker & docker-compose
安全提示:
- 避免使用 latest 標籤
- 定期更新映像(image)
- 注意容器權限配置
- 安裝必要的依賴
apt install apt-transport-https ca-certificates curl software-properties-common -y- 新增 Docker 官方倉庫
sudo add-apt-repository "deb [arch=amd64] https://download.docker.com/linux/ubuntu $(lsb_release -cs) stable"- 更新軟件包索引
apt update- 安裝 Docker CE
apt install docker-ce -y- 驗證 Docker 安裝
docker --version- 安裝 docker-compose
curl -L "https://github.com/docker/compose/releases/download/1.29.2/docker-compose-$(uname -s)-$(uname -m)" -o /usr/local/bin/docker-compose- 設定 docker-compose 執行權限
chmod +x /usr/local/bin/docker-compose- 驗證 docker-compose 安裝
docker-compose --version4. 伺服器管理
1Panel
- 執行一鍵安裝腳本
curl -sSL https://resource.1panel.hk/quick_start.sh -o quick_start.sh && bash quick_start.sh- 安裝過程中需要設定以下資訊:
- 安裝目錄(預設為 /opt)
- 面板存取埠(預設為 30840)
- 安全入口(建議自訂)
- 面板用戶名(建議自訂)
- 面板密碼(建議使用高強度密碼)
安裝成功之後,會有這樣一段日誌輸出
[1Panel Log]:
======================= Starting Installation =======================
Set 1Panel installation directory (default is /opt):
[1Panel Log]: The installation path you selected is /opt

The port you set is:  30840
Set 1Panel secure entrance (default is xxxxxxx):
Set 1Panel panel user (default is xxxxxx):
Set 1Panel panel password,xxxxxxx
可透過以下地址存取面板:
http://伺服器IP:30840注意事項:
- 請妥善保存安裝過程中的登入資訊
- 確保設定的埠在防火牆中已開放
- 建議配置 SSL 憑證確保安全存取
5. 網站統計
Umami
前置條件:
- 已安裝 Docker 和 Docker Compose
- 已準備好域名並完成解析(指向伺服器IP)
- 建立專案目錄
mkdir umami
cd umami- 建立 docker-compose.yml 檔案
version: "3"
services:
  umami:
    image: ghcr.io/umami-software/umami:postgresql-latest
    ports:
      - "3000:3000"
    environment:
      DATABASE_URL: postgresql://umami:umami@db:5432/umami
      DATABASE_TYPE: postgresql
      APP_SECRET: replace-me-with-a-random-string
      NEXTAUTH_URL: https://your-domain.com # 替換為你的域名
    depends_on:
      db:
        condition: service_healthy
    init: true
    restart: always
    healthcheck:
      test: ["CMD-SHELL", "curl http://localhost:3000/api/heartbeat"]
      interval: 5s
      timeout: 5s
      retries: 5
  db:
    image: postgres:15-alpine
    environment:
      POSTGRES_DB: umami
      POSTGRES_USER: umami
      POSTGRES_PASSWORD: umami
    volumes:
      - umami-db-data:/var/lib/postgresql/data
    restart: always
    healthcheck:
      test: ["CMD-SHELL", "pg_isready -U $${POSTGRES_USER} -d $${POSTGRES_DB}"]
      interval: 5s
      timeout: 5s
      retries: 5
volumes:
umami-db-data:- 啟動服務
docker-compose up -d- 存取配置
- 存取地址:
https://your-domain.com - 預設帳號:
admin - 預設密碼:
umami
重要配置說明:
- 必須修改預設管理員密碼
- 建議修改資料庫密碼(POSTGRES_PASSWORD)
- 設定隨機的 APP_SECRET 值
- 配置 SSL 憑證實現 HTTPS 存取
使用說明:
- 登入後建立網站
- 取得追蹤程式碼
- 將追蹤程式碼新增到需要統計的網站中
參考資料
- https://www.youtube.com/watch?v=SpxTFes1B8U
- https://hostalk.net/posts/vpstest_script.html
- https://github.com/awesome-selfhosted/awesome-selfhosted
- https://openalternative.co/
關注公眾號 技術後花園 取得更多資訊