背景
最近在整理资料时,发现2年前备份的hexo 网站的 md 源文件,才发现,自己的个人站点,已经2年多没有更新了,上次更新还是在2020年,在前司的办公电脑上操作的。趁着最近整理资料的契机,将个人博客重新部署、升级。
目标
- 迁移 hexo 源文件、配置
- 升级hexo 版本、Next 主题版本
- CI/CD ,github page 自动更新 ^832567
- hexo 源文件,相关的配置备份;源文件多端同步,能够在不同的电脑、终端编辑博客
- 多平台发布
- hexo博客
- 微信公众号
hexo 文件迁移
翻箱倒柜,从移动硬盘上找到了3年前备份的hexo目录,当时保险起见,把整个安装包备份了下来。hexo 博客下面几个目录/文件比较关键,只要这几个东西在,就能快速的重新把hexo搭建起来。
source目录下的源文件config配置文件theme中的主题配置文件package.jsonnode 依赖
- 把之前备份的整个目录 copy 到现在电脑上,删除
node_modules目录 - 执行
npm install安装相关依赖 npm install hexo-cli-ghexo server, 惊喜的发现,本地可以直接运行起来。有一个多语言适配的问题,后面再解决。
hexo 版本升级
hexo 版本升级过程比较简单,主要是更新相关的依赖内容 升级之前的版本信息
➜  imesong hexo version
(node:41891) Warning: Accessing non-existent property 'lineno' of module exports inside circular dependency
(Use `node --trace-warnings ...` to show where the warning was created)
(node:41891) Warning: Accessing non-existent property 'column' of module exports inside circular dependency
(node:41891) Warning: Accessing non-existent property 'filename' of module exports inside circular dependency
(node:41891) Warning: Accessing non-existent property 'lineno' of module exports inside circular dependency
(node:41891) Warning: Accessing non-existent property 'column' of module exports inside circular dependency
(node:41891) Warning: Accessing non-existent property 'filename' of module exports inside circular dependency
hexo: 4.2.1
hexo-cli: 4.3.0
os: darwin 21.6.0 12.6

node: 18.7.0
v8: 10.2.154.13-node.9
uv: 1.43.0
zlib: 1.2.11
brotli: 1.0.9
ares: 1.18.1
modules: 108
nghttp2: 1.47.0
napi: 8
llhttp: 6.0.7
openssl: 3.0.5+quic
cldr: 41.0
icu: 71.1
tz: 2022a
unicode: 14.0
ngtcp2: 0.1.0-DEV
nghttp3: 0.1.0-DEV
看了下 hexo 官网最新的版本已经升级到了 6.3。升级过程如下
//以下指令均在Hexo目录下操作,先定位到Hexo目录
//查看当前版本,判断是否需要升级
> hexo version

//全局升级hexo-cli
> npm i hexo-cli -g

//再次查看版本,看hexo-cli是否升级成功
> hexo version

//安装npm-check,若已安装可以跳过
> npm install -g npm-check

//检查系统插件是否需要升级
> npm-check

//安装npm-upgrade,若已安装可以跳过
> npm install -g npm-upgrade

//更新package.json
> npm-upgrade

//更新全局插件
> npm update -g

//更新系统插件
> npm update --save

//再次查看版本,判断是否升级成功
> hexo version
Next 版本升级
主题的升级过程稍显复杂,Next 主题从 7.8 版本升级到最新的 8.2 , 中间有 break changes,有一些配置文件需要手动 copy。升级步骤参Next官方文档。
[!NOTE] Breakking Changes There are some breaking changes that need attention when upgrading across versions.
- Update language configuration (for Simplified Chinese) Since v6.0.3,
zh-Hanshas been renamed tozh-CN: https://github.com/theme-next/hexo-theme-next/releases/tag/v6.0.3 Users upgrading to v6.0.3 and later need to explicitly modify thelanguageconfiguration in Hexo config file, otherwise the language display is incorrect.- Since v8.0.0, all libraries under the
next/source/libdirectory was moved out to @next-theme/plugins. Please see this article for the new 3rd-party libraries installation method: Adding Plugins.
[!NOTE] Next 主题官方升级步骤 NexT suggest to upgrade from version 5 or 7 to version 8 in this way:
- You need to do some copies of old NexT files: 1.1.
_config.ymlornext.yml(if you used Alternate Theme Config). 1.2. Custom CSS files placed innext/source/css/_custom/*andnext/source/css/_variables/*directories. 1.3. Custom layout files placed innext/layout/_custom/*. 1.4. Any another possible custom additions which can be found by compare tools between repositories.- Then rename the old NexT folder, for example, rename
nexttonext-old.- Install the new version according to the method provided in this article: installation instructions. Run
hexo cleanandhexo sto check whether the site works correctly.- Update Hexo and Hexo plugin If after completing the above steps, an error occurs when executing
hexo sorhexo g, it means that there may be a conflict between the old version of Hexo / Hexo plugin and the new version of the theme NexT. We recommend upgrading Hexo and Hexo plugins to the latest version. You can runnpm outdatedto see all the upgradeable plugins.- If you see any bugs or you simply does not like this version, you can switch back to the old version at any time.
github action CI/CD 自动部署博客
^bc6fa0
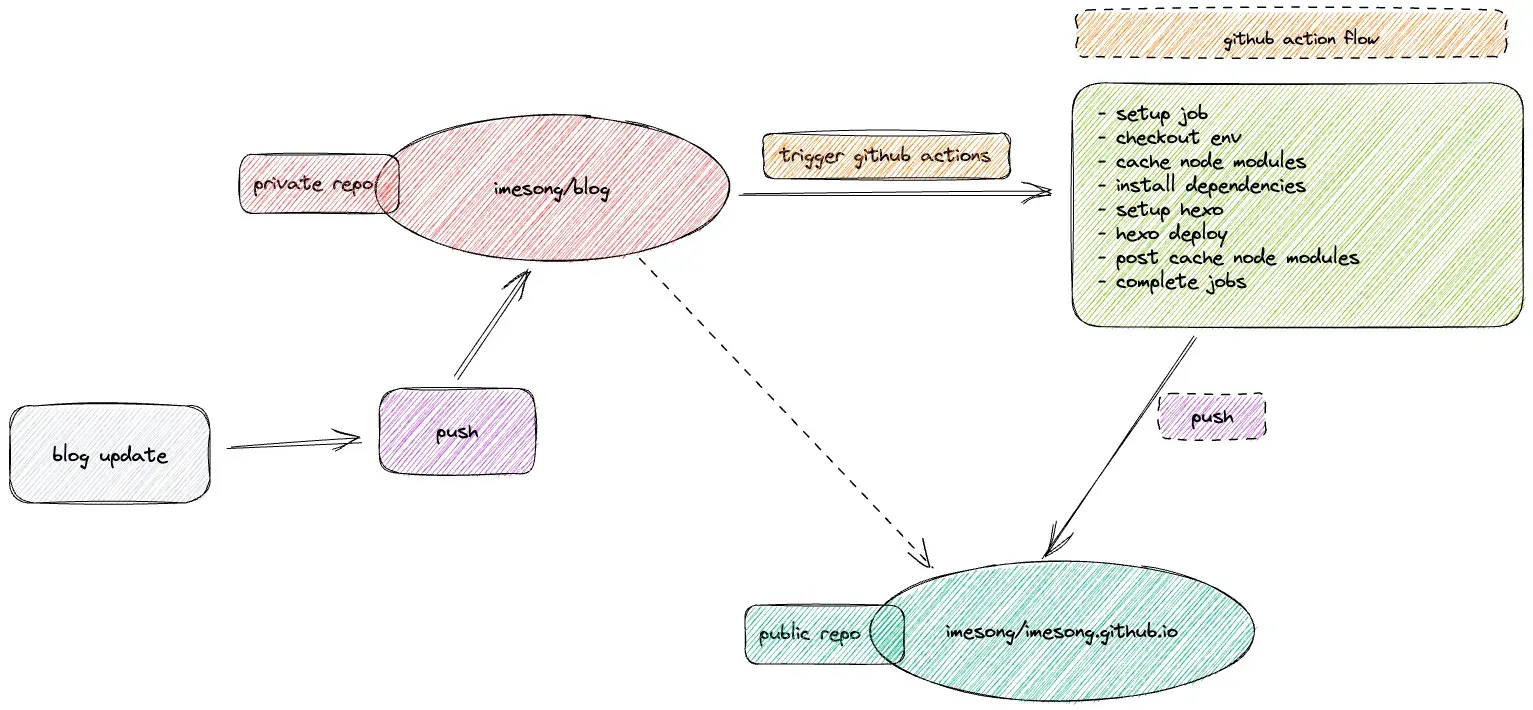
github action 的介绍,可以参考官网。通过 github 提供的 CI/CD 的能力,自动部署blog的工作流程如下:
 ^a5f3af
整体流程介绍
- 本地完成文章编辑,通过 git push 提交变更到私有仓库 imesong/blog
- imesong/blog 的 github action 捕捉到 push 事件,触发自动部署流程
- 部署流程完成后,将编译产物 push 到 imesong/imesong.github.io 的公共仓库
- 再次访问 imesong.com 时,会自动更新到最新的部署内容
github action 配置
- imesong/blog 的仓库需要配置 github action 的能力,在项目的根目录下新建
.github/worflows/deploy.yml的文件。github 会根据 deploy.yml 中配置的脚本,执行 workflow。 完整的脚本内容如下,具体的解释可以看官方文档。
name: Deploy

on:
  push:
    branches:
      - "main"

jobs:
  build:
    runs-on: ubuntu-latest
    name: A job to deploy blog.
    steps:
      - name: Checkout
        uses: actions/checkout@v1
        with:
          submodules: true # Checkout private submodules(themes or something else).

      # Caching dependencies to speed up workflows. (GitHub will remove any cache entries that have not been accessed in over 7 days.)
      - name: Cache node modules
        uses: actions/cache@v1
        id: cache
        with:
          path: node_modules
          key: ${{ runner.os }}-node-${{ hashFiles('**/package-lock.json') }}
          restore-keys: |
            ${{ runner.os }}-node-
      - name: Install Dependencies
        if: steps.cache.outputs.cache-hit != 'true'
        run: npm ci

      # Deploy hexo blog website.

      - name: Setup hexo
        env:
          ACTION_DEPLOY_KEY: ${{ secrets.HEXO_DEPLOY_SECRET }}
        run: |
          mkdir -p ~/.ssh/
          echo "$ACTION_DEPLOY_KEY" > ~/.ssh/id_rsa
          chmod 600 ~/.ssh/id_rsa
          ssh-keyscan github.com >> ~/.ssh/known_hosts
          git config --global user.email "[email protected]"
          git config --global user.name "imesong"
          npm install hexo-cli -g
          npm install
      - name: Hexo deploy
        run: |
          hexo clean
          hexo generate --d
- 私有仓库要能够向公共仓库 push 代码,需要在私有仓库配置一个 secret key, 在 public repo 配置一个 deploy key
- 使用 bash 命令,创建一个新的 ssh 秘钥
$ssh-keygen -f hexo-deploy-key
命令执行成功后,会在当前文件夹下生成 hexo-deploy-key 和 hexo-deploy-key.pub 两个文件。
- 登陆
public repo在 settings 中找到Secrets新增一个 Secrets
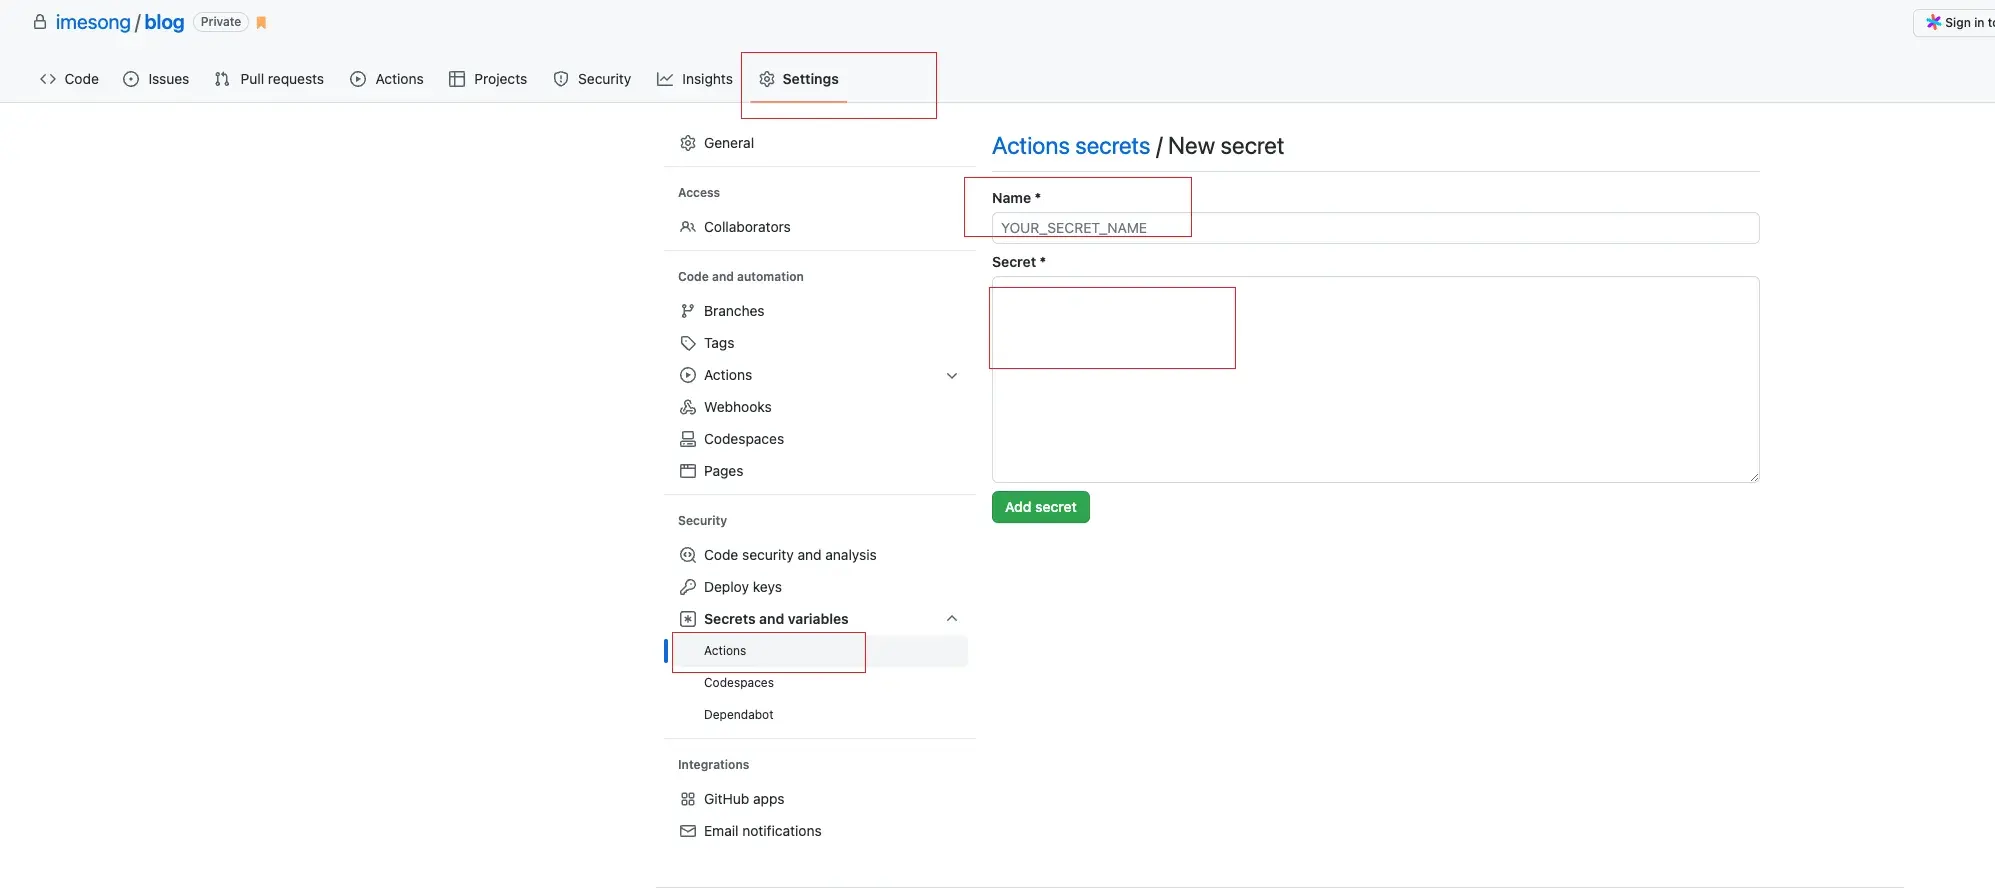
TITLE : HEXO_DEPLOY_SECRET
VALUE: hexo-deploy-key 中的内容
- 打开 public repo, 新增一个
deploy key
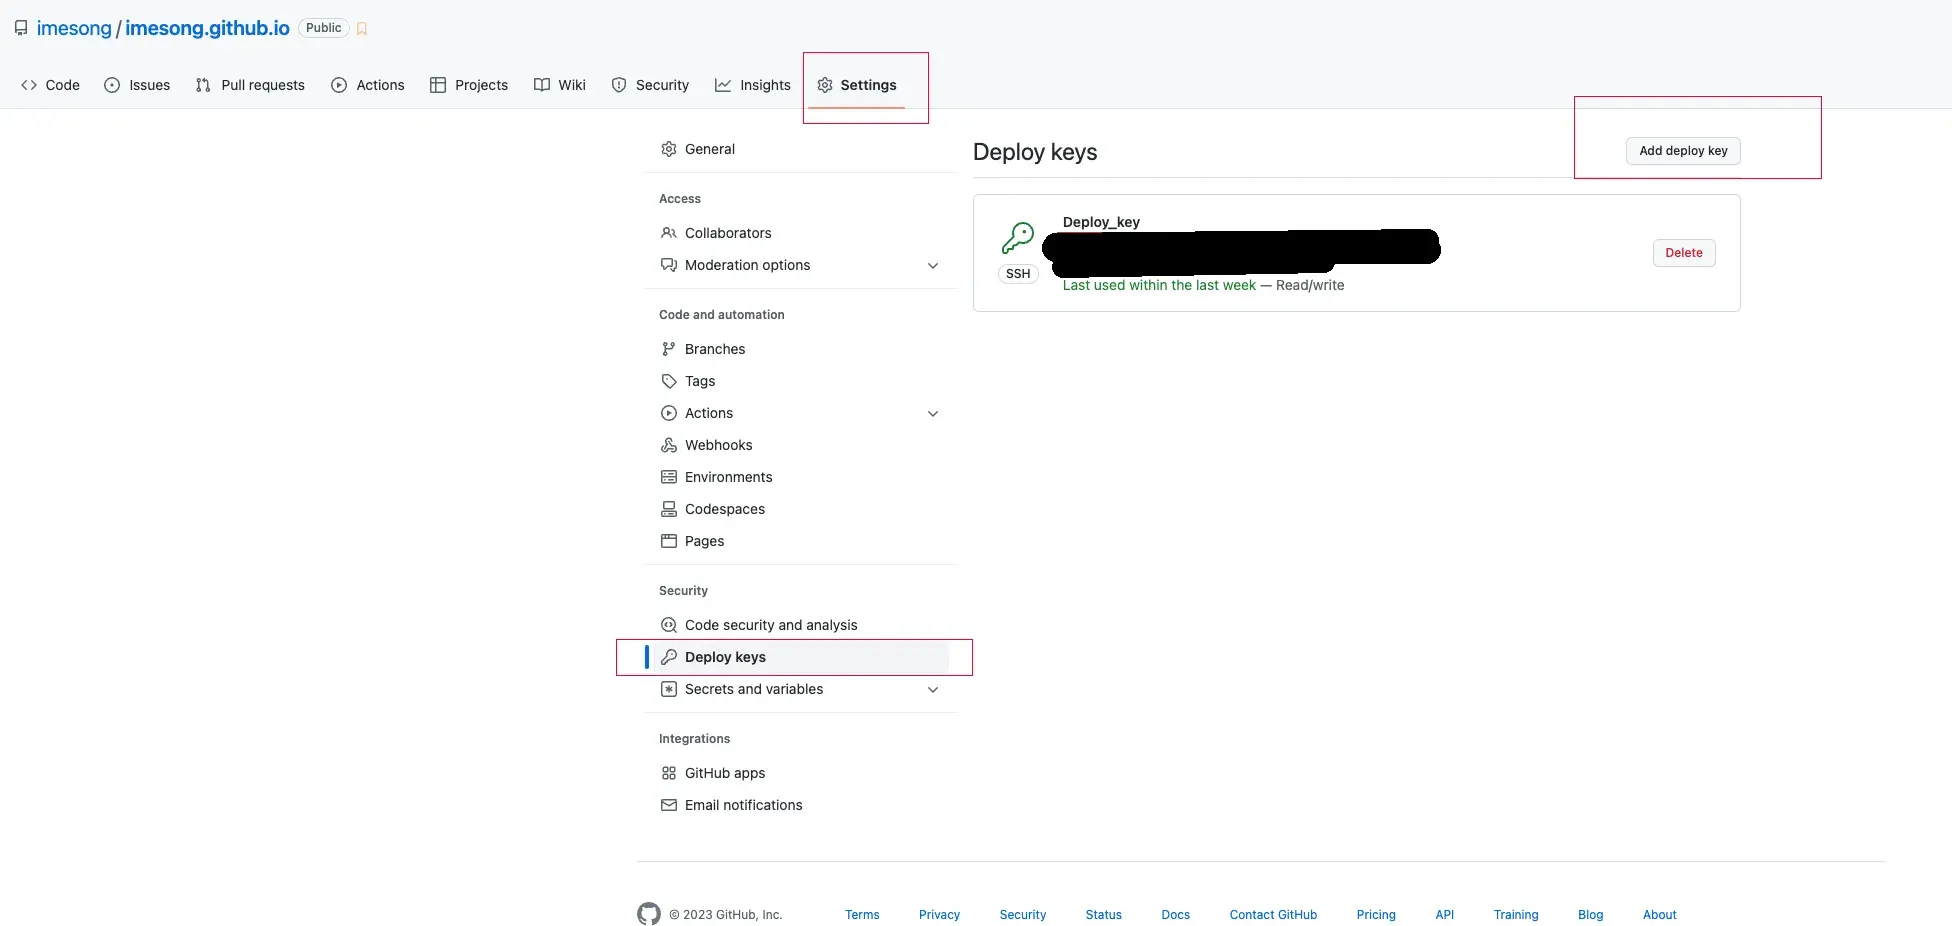
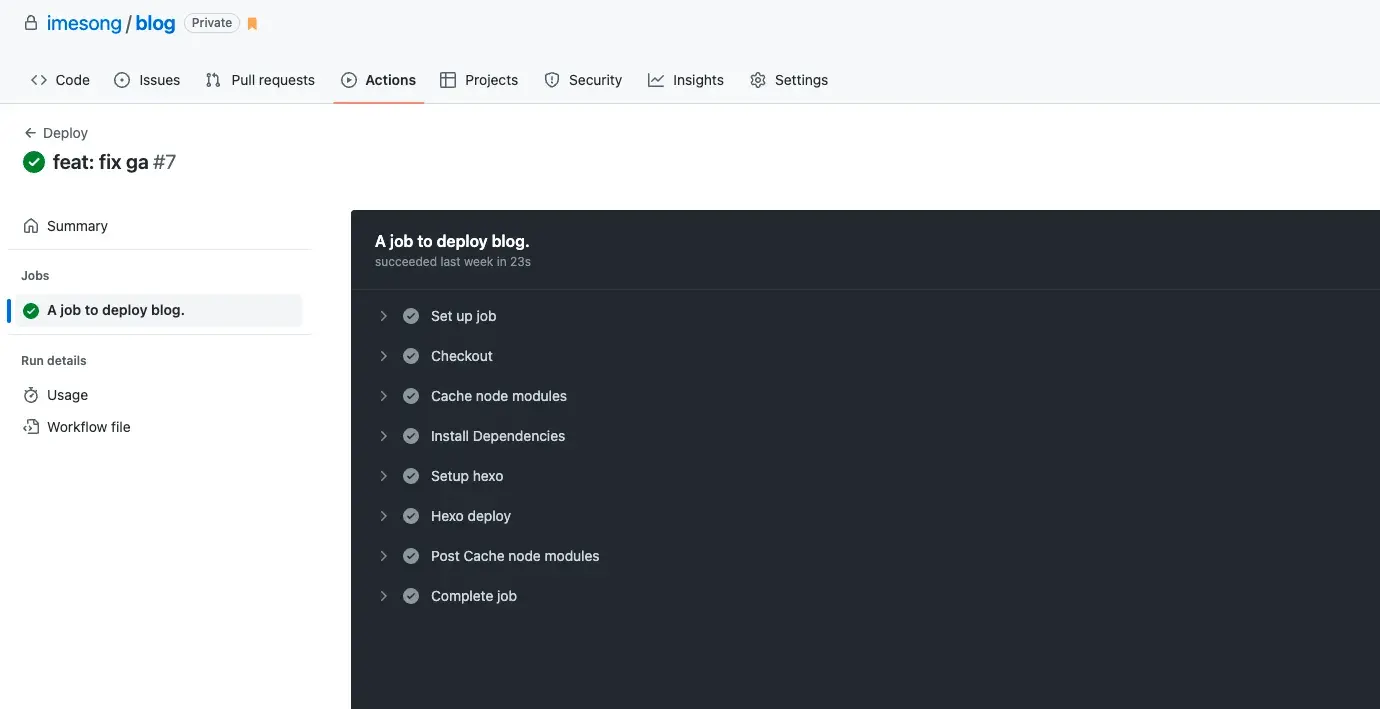
完成之后,编辑 blog ,push 之后查看 github action 执行情况
多端同步
-
github 备份
-
iCloud 备份
https://zhuanlan.zhihu.com/p/119483271
https://github.com/HaoChuan9421/nosync-icloud
多平台发布
多平台发布现在是个伪需求,当前最主要的是提高 blog 的更新频率和文章质量
文章在 Obsidian 中编辑好以后,发布 hexo ,生成固定链接,然后再讲文件 copy 到 mdnice 重新排版,调整样式适合微信公众号,最后复制到微信公众号发布。
Q&A
leanCloud 报错
Q: 使用 leanCloud 统计文档的阅读次数,更新完主题后,出现 Counter not initialized! See more at console err msg.
A: 解决方案有两种,最简单的方法,设置 leanCloud 的 security 插件为 false
leancloud_visitors:
  enable: true
  app_id: xxxx
  app_key: xxxx
  # Required for apps from CN region
  server_url: # <your server url>
  # Dependencies: https://github.com/theme-next/hexo-leancloud-counter-security
  # If you don't care about security in leancloud counter and just want to use it directly
  # (without hexo-leancloud-counter-security plugin), set `security` to `false`.
  security: false
参考资源
https://zhangferry.com/2022/07/24/github_action_for_blog_deploy/
https://makefile.so/2021/11/28/use-github-actions-to-deploy-hexo-blog/
关注公众号 技术后花园 获取更多信息